If you’re running Meta Ad campaigns, reliable conversion tracking isn’t optional: it’s the foundation of campaign optimisation, audience building, and ROI measurement. Fragmented, inconsistent tracking data undermines your ability to make confident decisions about budget allocation and campaign performance.
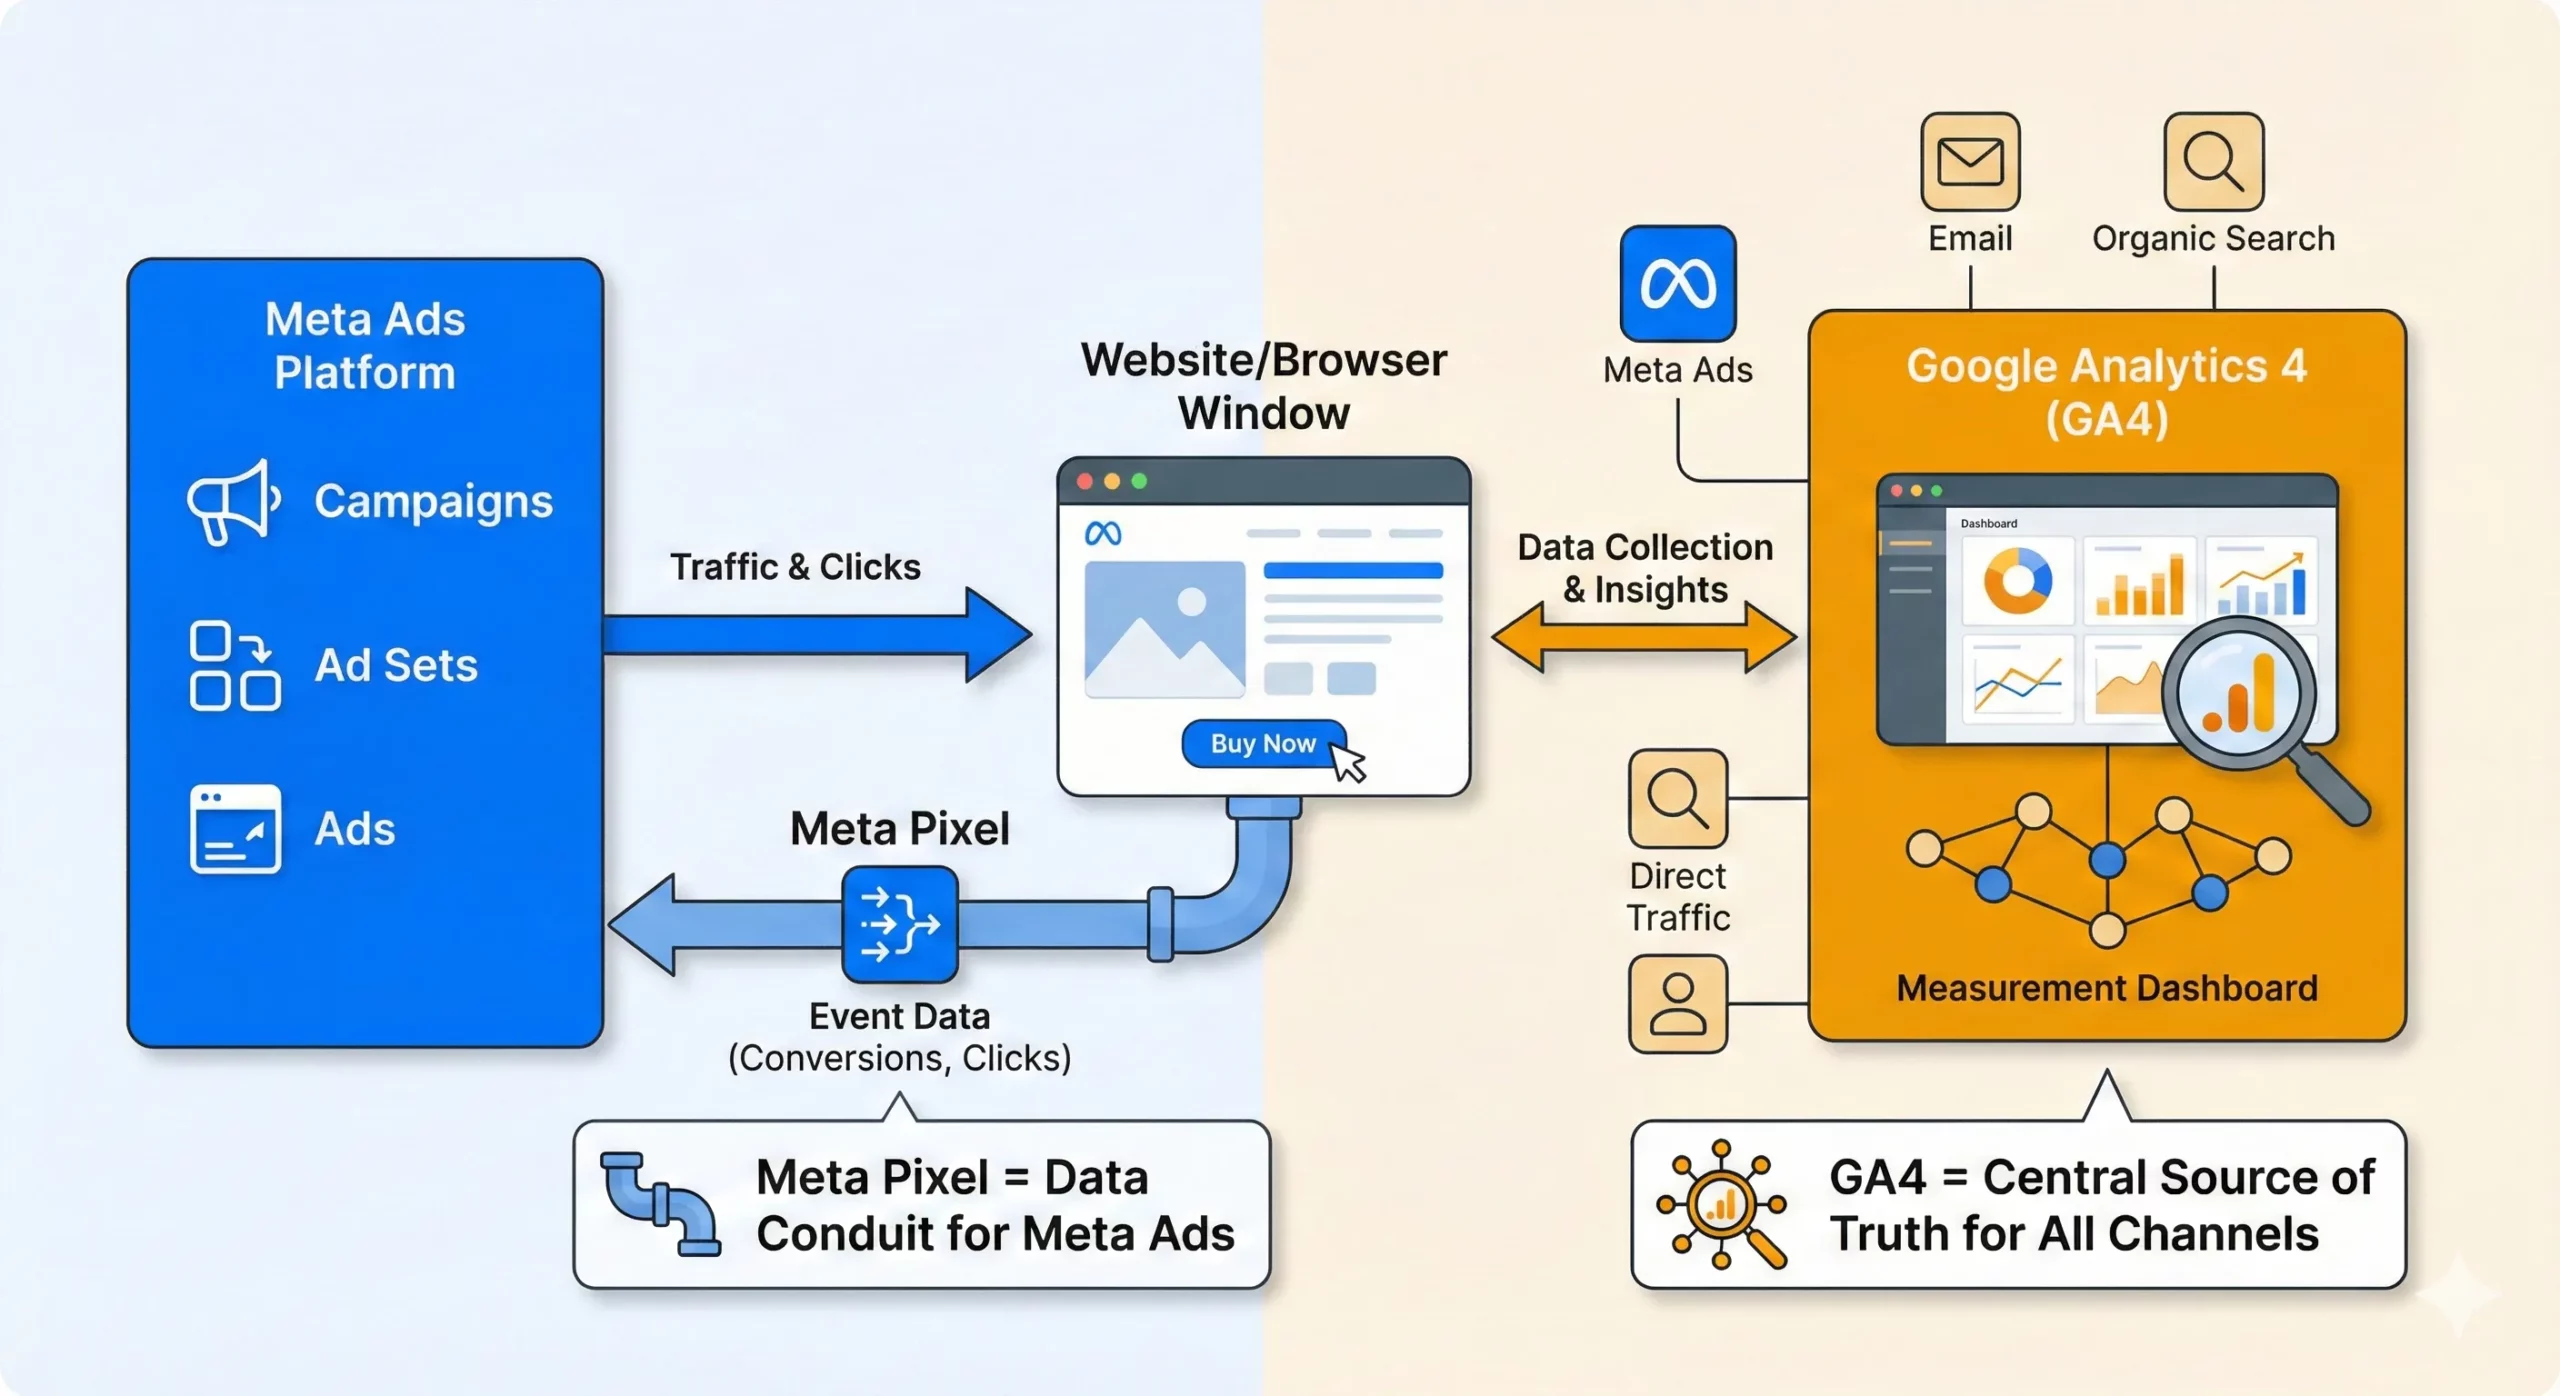
The solution is to establish a “single source of truth” for all tracking: a centralised, well-structured data layer that ensures every platform in your marketing stack operates from the same reliable foundation. If you have an existing Google Analytics 4 (GA4) data layer, you can leverage that same infrastructure to power your Meta Pixel, ensuring your Meta conversion tracking is built on consistent, structured data rather than fragile workarounds.
This guide details the definitive methodology for using your GA4 data layer to power a complete Meta Pixel client-side tracking implementation within Google Tag Manager (GTM). Whether you’re implementing conversion tracking for e-commerce purchase events or lead generation goals, this methodology ensures your conversion data flows accurately into Meta’s optimisation algorithms. Proper conversion tracking is essential for campaign performance measurement, automated bidding strategies, and return on ad spend (ROAS) reporting.
Table of Contents
Why Use Google Tag Manager and the GA4 Data Layer for Meta Pixel Tracking?

Before diving into implementation, it’s essential to understand why this methodology (leveraging Google Tag Manager and your existing GA4 data layer) represents a fundamentally superior approach to Meta Pixel deployment compared to direct code installation.
The Traditional Alternative: Direct Meta Pixel Installation
Meta’s default implementation guide recommends pasting pixel code directly into your website’s theme files or page templates. Whilst this appears simple initially, it creates three critical weaknesses:
- Fragile, design-coupled tracking: Conversion events tied to specific page URLs or HTML elements break silently when your site is redesigned or A/B tested
- Developer bottleneck: Every tracking modification (adding a new event, updating parameters, or fixing broken code) requires developer intervention and deployment cycles
- Data inconsistency across platforms: When different platforms report conflicting data due to inconsistent tracking methods, you lose the ability to understand where legitimate differences (like attribution models) end and tracking errors begin
The Google Tag Manager + Data Layer Advantage
Using GTM with a properly structured data layer solves these problems through architectural separation:
Stability and design independence: The data layer decouples your tracking logic from your website’s visual presentation. Marketing and development teams can redesign pages, modify layouts, or restructure content without touching (or breaking) your measurement infrastructure.
Marketing autonomy and speed: Once the data layer foundation is established, marketers can deploy new Meta events, modify parameters, or troubleshoot issues entirely within GTM’s interface. No developer tickets, no deployment queues, no waiting.
The “single source of truth” principle: Most importantly, this approach eliminates tracking inconsistencies. When both GA4 and Meta Pixel consume identical data from the same source (your data layer), they receive the same conversion values, revenue figures, and user interactions. Platforms will still differ in their final reports due to their distinct attribution models, but those differences reflect legitimate methodological choices, not tracking errors. This clarity transforms analytics from a source of confusion into a foundation for strategic decision-making.
The Efficiency Multiplier: Once your GA4 data layer is properly configured (a one-time investment), adding Meta Pixel tracking becomes a simple mapping exercise in GTM. The same structured events that power GA4 (purchase, add_to_cart, view_item) can simultaneously power Meta Pixel, your CRM, email platforms, and any other tool in your stack. This is the operational efficiency that defines modern, scalable marketing operations.
For organisations serious about accurate measurement in an increasingly privacy-centric digital landscape, this methodology isn’t optional: it’s foundational.
Going Deeper: For a comprehensive exploration of what a data layer is, the specific problems it solves, and why it’s the essential foundation for any robust tracking setup, see Using the Data Layer with Google Tag Manager.
Understanding the Meta Pixel (Facebook Pixel)
The Meta Pixel is a piece of JavaScript code that tracks user actions on your website and sends this data to Meta’s advertising platform. This tracking enables sophisticated advertising capabilities across Facebook, Instagram, Messenger, and the broader Meta advertising network.
What the Meta Pixel Does
Core Functions:
- Action Tracking: Records when users view products, add items to cart, make purchases, or complete other meaningful actions
- Audience Building: Creates custom audiences based on website behavior for targeting and retargeting campaigns
- Conversion Optimisation: Provides Meta’s algorithm with conversion data to optimise ad delivery for your business goals
- Attribution: Tracks which ads led to conversions, enabling accurate return on ad spend (ROAS) measurement
- Dynamic Advertising: Powers dynamic product ads that show users specific products they viewed or similar items
Why the Meta Pixel is Essential for Digital Marketing
Advertising Optimisation: Meta’s advertising algorithm uses pixel data to automatically optimise your campaigns. Without pixel data, you’re essentially advertising blind – you can reach people, but you can’t measure results or improve targeting based on actual website behavior.
Audience Targeting: The pixel creates powerful audience segments such as:
- People who viewed specific products but didn’t purchase
- Customers who bought in the last 30 days
- Visitors who spent significant time on pricing pages
- Users who abandoned their shopping cart
Performance Measurement: Accurate conversion tracking enables data-driven decisions about:
- Which ad creative performs best
- Which audiences generate the highest value customers
- How to allocate budget across different campaigns
- What return on ad spend you’re actually achieving
How Meta Pixel Integrates with Your Marketing Stack
The Data Flow:
- User performs action on your website (views product, makes purchase)
- GA4 captures this action in your analytics data layer
- Meta Pixel reads the same data layer and sends event data to Meta
- Meta associates the action with the user’s Facebook/Instagram profile
- This data powers targeting, optimisation, and measurement in Meta’s advertising platform
Client-Side vs Server-Side Tracking:
- Client-Side (this guide): Pixel fires directly from user’s browser, providing real-time data
- Server-Side (future implementation): Your server sends event data to Meta, providing backup tracking and privacy compliance
- Hybrid Approach (recommended): Both methods working together with deduplication for maximum accuracy
Privacy and Compliance Considerations
User Consent: The Meta Pixel collects user data, so proper consent mechanisms are essential. Ensure your privacy policy covers Meta Pixel usage and implement appropriate consent management for regions with strict privacy laws (GDPR, CCPA).
Data Sharing: The pixel shares website behaviour data with Meta to improve advertising effectiveness. This data is used for ad targeting and optimisation but is governed by Meta’s data use policies.
Browser Restrictions: Modern browsers and privacy tools (Safari’s ITP, ad blockers) can limit pixel functionality. This is why server-side tracking (CAPI) is becoming essential for comprehensive measurement.
Business Impact of Proper Implementation
Revenue Growth: Businesses typically see 20-30% improvement in Meta advertising performance after implementing comprehensive pixel tracking with proper event data.
Cost Efficiency: Accurate conversion data enables Meta’s algorithm to find customers at lower costs by optimising for actual business results rather than generic engagement metrics.
Strategic Insights: Rich event data reveals customer behaviour patterns that inform not just advertising strategy, but broader business decisions about product positioning, pricing, and website optimisation.
How to Get Your Meta Pixel ID
Before you can start tracking, you need to locate your Meta Pixel ID. This is a unique number that connects your website tracking to your Meta (Facebook) ad account. Don’t worry – finding it takes just a few minutes.
Finding Your Pixel ID
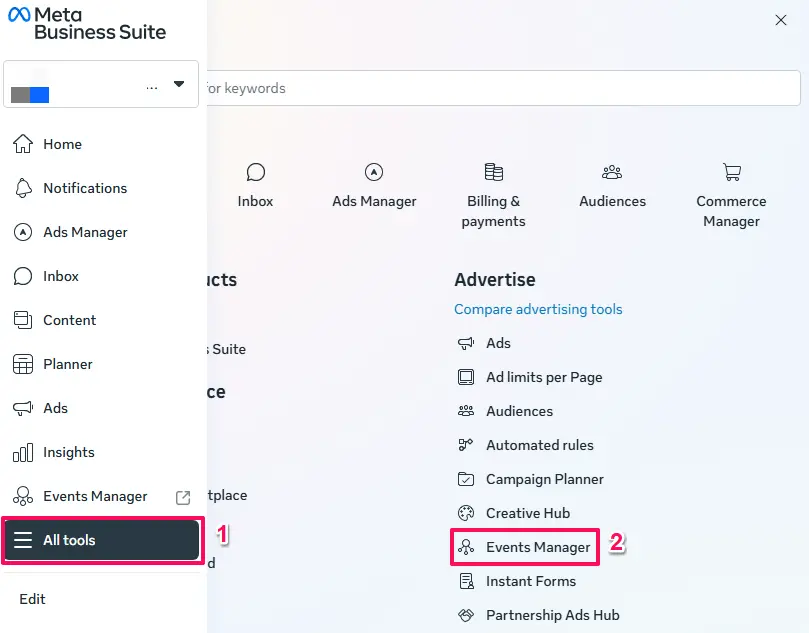
- Access Meta Events Manager
- Go to business.facebook.com
- Log in with your Facebook account credentials
- From the left sidebar, click All Tools > Events Manager.
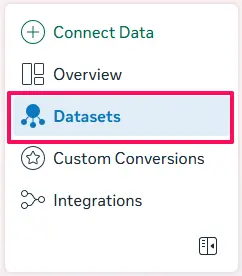
- Navigate to Datasets
- Once in Events Manager, look for Datasets and click on it to see all your tracking pixels.
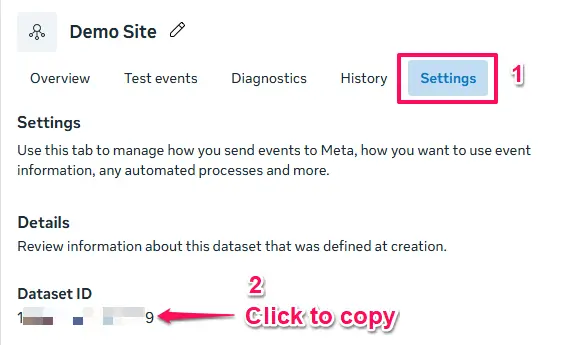
- Copy Your Pixel (Dataset) ID
- On the Overview Tab: Look for the ID under the Dataset name (depends on screen size) or next the the chart and copy it.
- On Settings Tab: If you don’t see it on the overview tab go the settings tab and copy it from there.
- You’ll need this number for the GTM setup.
Create a Meta Pixel if You Don’t Have One
- Acces the Events Manager – steps 1 from above.
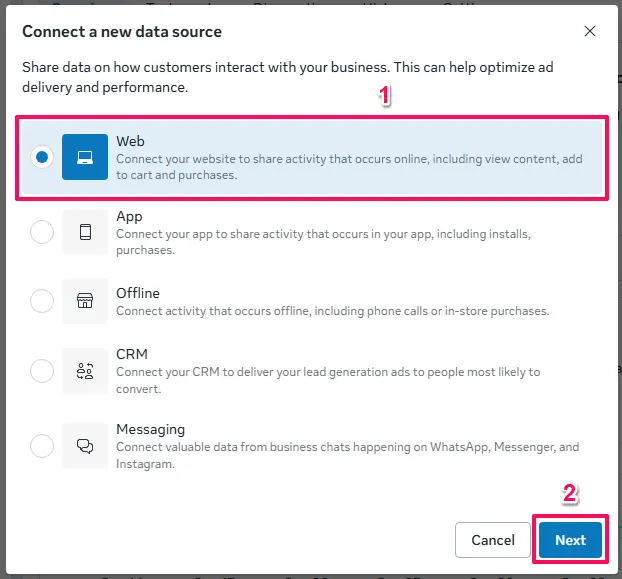
- Click Connect Data.
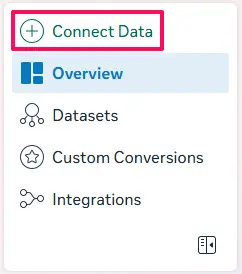
- Select Web as your platform.
- Enter a Name for the pixel.
- Click the Create button.
- Copy you Pixel (Dataset) ID (see step 3 from the previous section).
What If I Can’t Access Events Manager?
If you don’t see Events Manager in your menu, it likely means:
- You don’t have a Meta Business Manager account yet – create one here
- You don’t have admin access to the business account – ask your business manager admin to grant you access
- Your account needs to be added to the specific ad account – check with your team’s Meta Ads administrator
Prerequisites: Assembling Your Toolkit
Before proceeding with the implementation, it is essential to ensure that all necessary components are in place. The success of this entire process is contingent upon the quality and completeness of the foundational data layer. A non-standard or improperly configured data layer is the most common point of failure. Therefore, it is strongly recommended to proactively validate the existing data layer using Google Tag Manager’s Preview Mode before building any Meta Pixel tags. This preemptive quality assurance step transforms the process from reactive debugging to a more efficient, proactive implementation.
The following assets are required:
- A Meta Business Manager Account and Pixel ID: A valid Meta Pixel must be created within Meta Events Manager. The numerical Pixel ID is the unique identifier that links the tracking tags to the correct Meta ad account. This ID can be found by navigating to Events Manager, selecting “Data Sources,” and choosing the relevant Pixel.
- A Google Tag Manager (GTM) Container: A GTM container must be correctly installed on every page of the website. The GTM container snippet should be placed high in the
<head>of the page, with the<noscript>portion placed immediately after the opening<body>tag. - A Functioning GA4 Data Layer: This is the most critical prerequisite. The website’s data layer must be populated with events and parameters that conform to Google’s officially recommended e-commerce schema. This includes the proper structure for key events such as
view_item,add_to_cart, andpurchase. For an authoritative reference on the required structure, consult Google’s official developer documentation for Recommended Events.
Validating Your Data Layer Before Implementation
Before building any Meta Pixel tags, you must validate that your GA4 data layer is functioning correctly and contains the required data structure. This validation step is absolutely critical – a faulty data layer is the most common cause of tracking implementation failure.
Step-by-Step Data Layer Validation Process:
- Enable Google Tag Manager Preview Mode
- In your GTM workspace, click the Preview button in the top right
- Enter your website’s URL and click Connect
- A new tab will open with your website, and Tag Assistant will launch
- Test Each Required EventFor view_item validation:
- Navigate to any product detail page on your website
- In Tag Assistant, look for a “view_item” event in the left panel
- Click on the event to expand it
- Select the “Data Layer” tab to inspect the data structure
- Add a product to your cart
- Look for an “add_to_cart” event in Tag Assistant
- Inspect the data layer structure
- Complete a test purchase (use a test mode if available)
- Look for a “purchase” event on the confirmation page
- This is the most critical event to validate thoroughly
- Verify Required Data Structure Each event should contain these key elements in the Data Layer tab
For e-commerce events:
{
  event: "view_item", // Changes to: add_to_cart, purchase
  ecommerce: {
    currency: "USD", // Required for all monetary events
    value: 29.99, // Total value - may be item price or order total
    items: [{ // Product/content array
      item_id: "product_sku_123",
      item_name: "Product Name",
      price: 29.99,
      quantity: 1
    }]
  }
}For lead generation events:
{
  event: "generate_lead",
  value: 500.00, // Estimated lead value
  currency: "USD",
  lead_source: "xyz form" // Optional
}Key Validation Points:
- Event name matches the action being tracked
- Currency is present for all monetary events
- Value contains appropriate amount
- Items array is present and complete for e-commerce events
- Item_id values are clean and consistent
- Lead events may include custom parameters for better categorisation
Common Data Layer Issues and Solutions
- Issue: No events appearing in Tag Assistant
- Solution: Check that GTM container code is installed correctly
- Verify events are being pushed to the data layer by your e-commerce platform
- Issue: Events appear but ecommerce object is missing
- Solution: Your GA4 implementation may not be using the proper e-commerce structure
- Contact your developer to implement proper e-commerce tracking
- Issue: Items array is empty or undefined
- Solution: Product data isn’t being passed correctly
- Check your e-commerce platform’s GA4 integration settings
- Issue: Currency or value parameters missing
- Solution: Ensure your e-commerce platform is configured to send financial data
- Verify currency settings in your GA4 property match your website
- Issue: Item_id contains spaces or special characters
- Solution: Product SKUs should be clean identifiers without spaces
- Work with your developer to standardise product ID format
Red Flags That Require Resolution Before Proceeding:
- Events not firing at all
- Empty or null ecommerce objects
- Missing currency or value data
- Inconsistent item_id formats
- Items arrays with missing required fields
Only proceed to Meta Pixel implementation once your data layer validation shows clean, consistent data for all required events. A flawed foundation will result in inaccurate tracking that compromises your advertising performance measurement.
Foundational Setup in Google Tag Manager
With the prerequisites confirmed, the next step is to configure the foundational components within GTM. This involves installing the official Meta Pixel tag template and creating a crucial variable for event deduplication.
Step 1: Install the Official Facebook Pixel Template
The modern, secure, and recommended method for deploying the Meta Pixel is through the GTM Community Template Gallery. This approach is superior to the legacy Custom HTML method because the templates are vetted by Google for security and performance, and they provide a user-friendly interface that minimises the risk of implementation errors.
- In your GTM container, navigate to the Templates section from the left-hand menu.
- Within the Tag Templates box, click Search Gallery.
- Click the earch icon and in the search bar that appears, type “Facebook Pixel”.
- Select the template named Facebook Pixel published by facebookarchive. This template was originally created by the respected analytics expert Simo Ahava and was later acquired by Meta, making it the de facto official template.
- Click Add to workspace and confirm by clicking Add on the permissions prompt.
Step 2: Create a Constant Variable for the Pixel ID
To ensure a scalable and easily maintainable GTM container, the Meta Pixel ID should be stored in a Constant Variable. This practice prevents the need to manually update the ID in dozens of individual tags if it ever changes; instead, the update is made in one central location.
- Navigate to the Variables section.
- Under User-Defined Variables, click New.
- Name the variable
Const - Meta Pixel ID. - Click Variable Configuration and choose the Constant variable type from the Utilities section.
- In the Value field, paste your Meta Pixel ID.
- Click Save.
Step 3: Creating the Unique event_id Variable
This step is absolutely critical for creating a modern, future-proof tracking setup. Meta receives event data from two primary channels: the client-side browser (via the Meta Pixel) and the server-side (via the Conversions API or CAPI). When both are implemented, the same user action (e.g., a purchase) will be sent to Meta twice. To avoid double-counting conversions and polluting ad performance data, Meta requires a shared, unique identifier to recognise that these two signals represent the same event. This identifier is the event_id.
Implementing the event_id on the client side now, even if a CAPI implementation is planned for the future, is an essential preparatory step. Rather than writing custom code, the most robust and maintainable approach is to use a pre-built solution from the GTM Community Template Gallery.
Install and Use the Stape.io “Unique Event ID” Variable
The “Unique Event ID” variable template from stape.io is purpose-built for this exact scenario. It generates a unique ID for each event based on the data layer, a timestamp, and a random number, ensuring reliability for deduplication.
- In your GTM container, navigate to Templates and click Search Gallery under “Variable Templates”.
- Search for
Unique Event ID. - Select the template named Unique Event ID published by stape-io and click Add to workspace. Confirm any permissions prompts.

- Once added, navigate to Variables and click New under “User-Defined Variables.”
- Name it
Event ID. - Click Variable Configuration and select the Unique Event ID template you just added.
- No further configuration is needed in the template itself. Click Save.

This variable is now ready to be used in all your Meta Pixel event tags to provide a consistent, unique ID for deduplication.
Step 4: Creating Essential Data Layer Variables
Before building the Meta Pixel event tags, you must create the Data Layer Variables that will extract the necessary information from your GA4 data layer. These variables serve as the bridge between the data layer structure and your Meta Pixel tags.
The following Data Layer Variables are required for the e-commerce event tracking covered in this guide:
Core E-commerce Variables:
Navigate to Variables in GTM and create each of the following Data Layer Variables by clicking New under “User-Defined Variables”:
- DLV – ecommerce.currency
- Variable Type: Data Layer Variable
- Data Layer Variable Name:
ecommerce.currency - This captures the currency code (e.g., USD, EUR) from purchase and cart events.

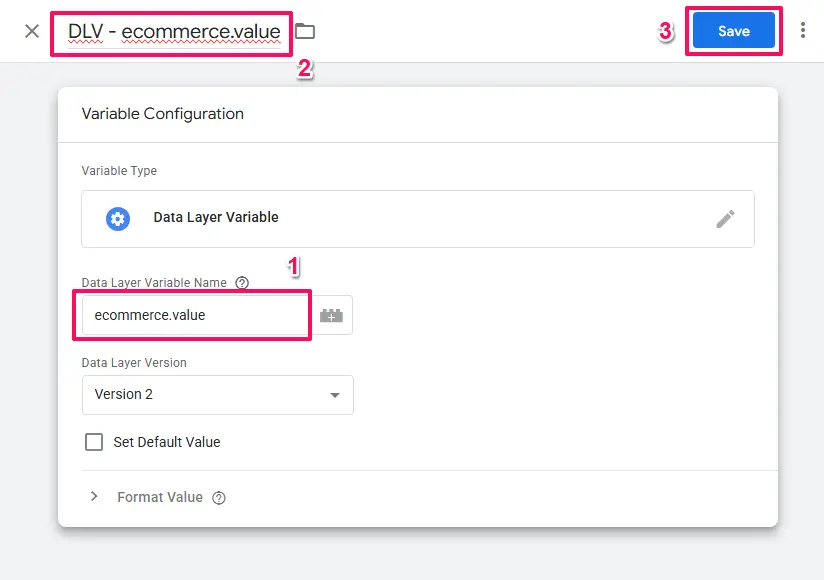
- DLV – ecommerce.value
- Variable Type: Data Layer Variable
- Data Layer Variable Name:
ecommerce.value - This captures the total monetary value from purchase events.
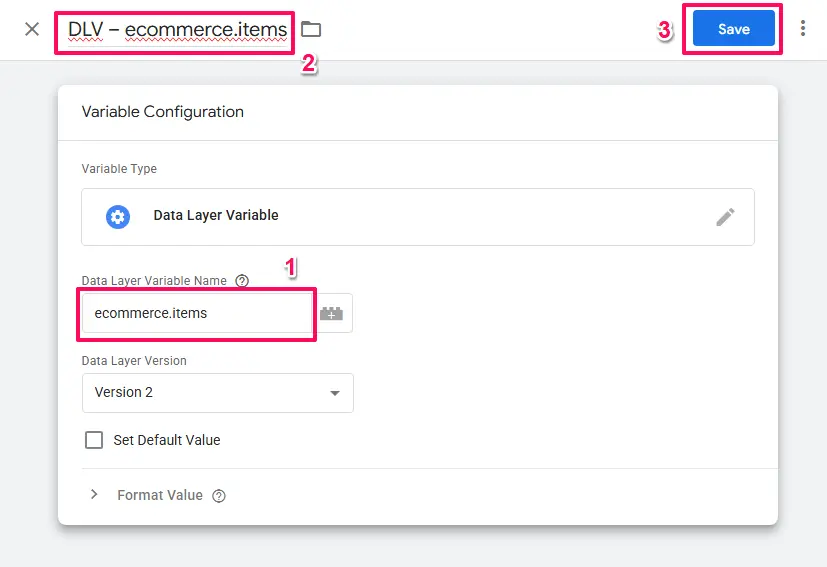
- DLV – ecommerce.items
- Variable Type: Data Layer Variable
- Data Layer Variable Name:
ecommerce.items - This captures the entire items array, used by Custom JavaScript variables for transformation.
Lead Variables:
- DLV – value
- Variable Type: Data Layer Variable
- Data Layer Variable Name:
value - This captures the value of the lead.
- DLV – currency
- Variable Type: Data Layer Variable
- Data Layer Variable Name:
currency - This captures the currency code (e.g., USD, EUR).
Important Notes:
- All events (ViewContent, AddToCart, and Purchase) will use the same consistent mapping approach with Custom JavaScript variables for maximum reliability and data consistency.
- The
ecommerce.itemsarray variable feeds the Custom JavaScript variables that handle the data transformation to Meta’s required format. - These variable names must match exactly, including capitalisation and punctuation.
- You can verify these variables are working correctly using GTM’s Preview Mode before building your tags.
Step 5: Creating Custom JavaScript Variables for Data Transformation
Meta Pixel events require a different data structure than GA4’s ecommerce format. While GA4 uses an ecommerce.items array with detailed product information, Meta expects simplified content_ids arrays and contents objects. Custom JavaScript variables handle this transformation automatically, ensuring your data flows correctly from GA4 to Meta.
The following Custom JavaScript variables are essential for all e-commerce event tracking:
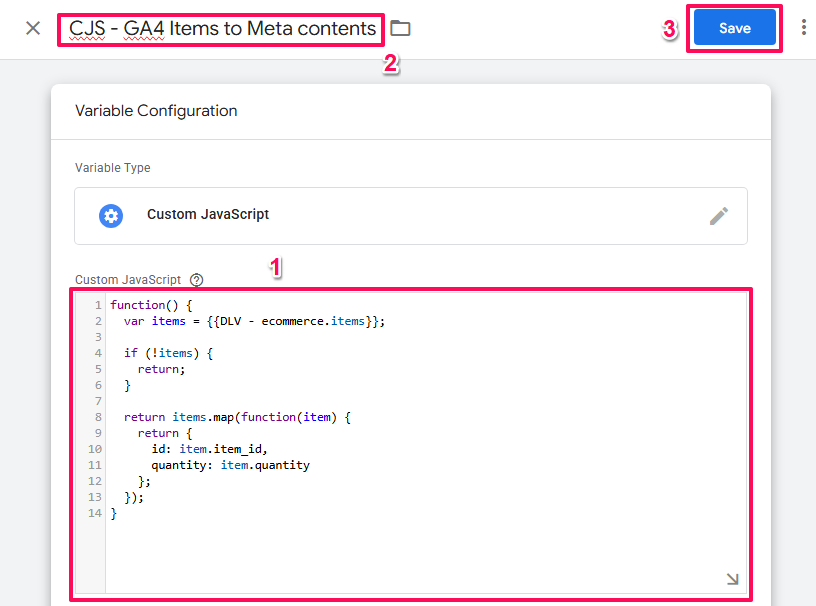
CJS – GA4 Items to Meta content_ids
This variable converts the GA4 items array into a simple array of product IDs, exactly as Meta requires.
- Navigate to Variables and click New under “User-Defined Variables”
- Name the variable:
CJS - GA4 Items to Meta content_ids - Select Variable Type: Custom JavaScript
- Enter this code:
function() {
  var items = {{DLV - ecommerce.items}};

  if (!items) {
    return;
  }

  return items.map(function(item) {
    return item.item_id;
  });
}
CJS – GA4 Items to Meta contents
This variable transforms the GA4 items array into Meta’s required contents format (objects with id and quantity).
- Navigate to Variables and click New
- Name the variable:
CJS - GA4 Items to Meta contents - Select Variable Type: Custom JavaScript
- Enter this code:
function() {
  var items = {{DLV - ecommerce.items}};

  if (!items) {
    return;
  }

  return items.map(function(item) {
    return {
      id: item.item_id,
      quantity: item.quantity
    };
  });
}
Why These Variables Are Essential:
- Data Structure Compatibility: Bridges the gap between GA4 and Meta data formats
- Consistency: Same variables work for ViewContent, AddToCart, and Purchase events
- Error Handling: Built-in null checks prevent JavaScript errors
- Future-Proof: Handles both single and multiple item scenarios automatically
With these foundational components now in place, you’re ready to build the Meta Pixel event tags.
Understanding Meta Pixel Events: Standard vs Custom

Before diving into the implementation, it’s helpful to understand what “events” actually are and why they matter for your advertising strategy.
What Is an Event?
An event is simply a specific action that a user takes on your website. When someone views a product page, adds an item to their cart, or completes a purchase, each of these actions is an “event” that can be tracked and sent to Meta.
Think of events as the building blocks of your advertising data. Each event tells Meta’s advertising system something valuable about user behavior, which helps the platform:
- Understand which ads lead to valuable actions
- Optimise ad delivery to people most likely to convert
- Build audiences of users who have shown specific interests or behaviors
- Measure the return on investment (ROI) of your ad campaigns
Standard Events vs Custom Events
Meta provides two categories of events you can track:
Standard Events

Standard events are pre-defined by Meta for common actions that most businesses want to track. Meta has already built the infrastructure to recognise, optimise for, and report on these events. This makes them more powerful for advertising purposes.
Common Standard Events Include:
- PageView: Someone loads any page on your website
- ViewContent: Someone views a specific product or content page
- AddToCart: Someone adds a product to their shopping cart
- InitiateCheckout: Someone begins the checkout process
- Purchase: Someone completes a transaction
- Lead: Someone submits a form (contact, newsletter, quote request)
- Search: Someone uses your site’s search function
- AddToWishlist: Someone adds an item to a wishlist or favorites
Why Use Standard Events?

- Meta’s algorithm is specifically trained to optimise ad delivery for these events
- They unlock advanced features like Dynamic Ads and Value Optimisation
- Reporting is automatically structured and comparable across all Meta advertisers
- They’re required for using Meta’s Conversions API effectively
Custom Events
Custom events are actions unique to your business that don’t fit into Meta’s standard event categories. You define the name and decide what triggers them.
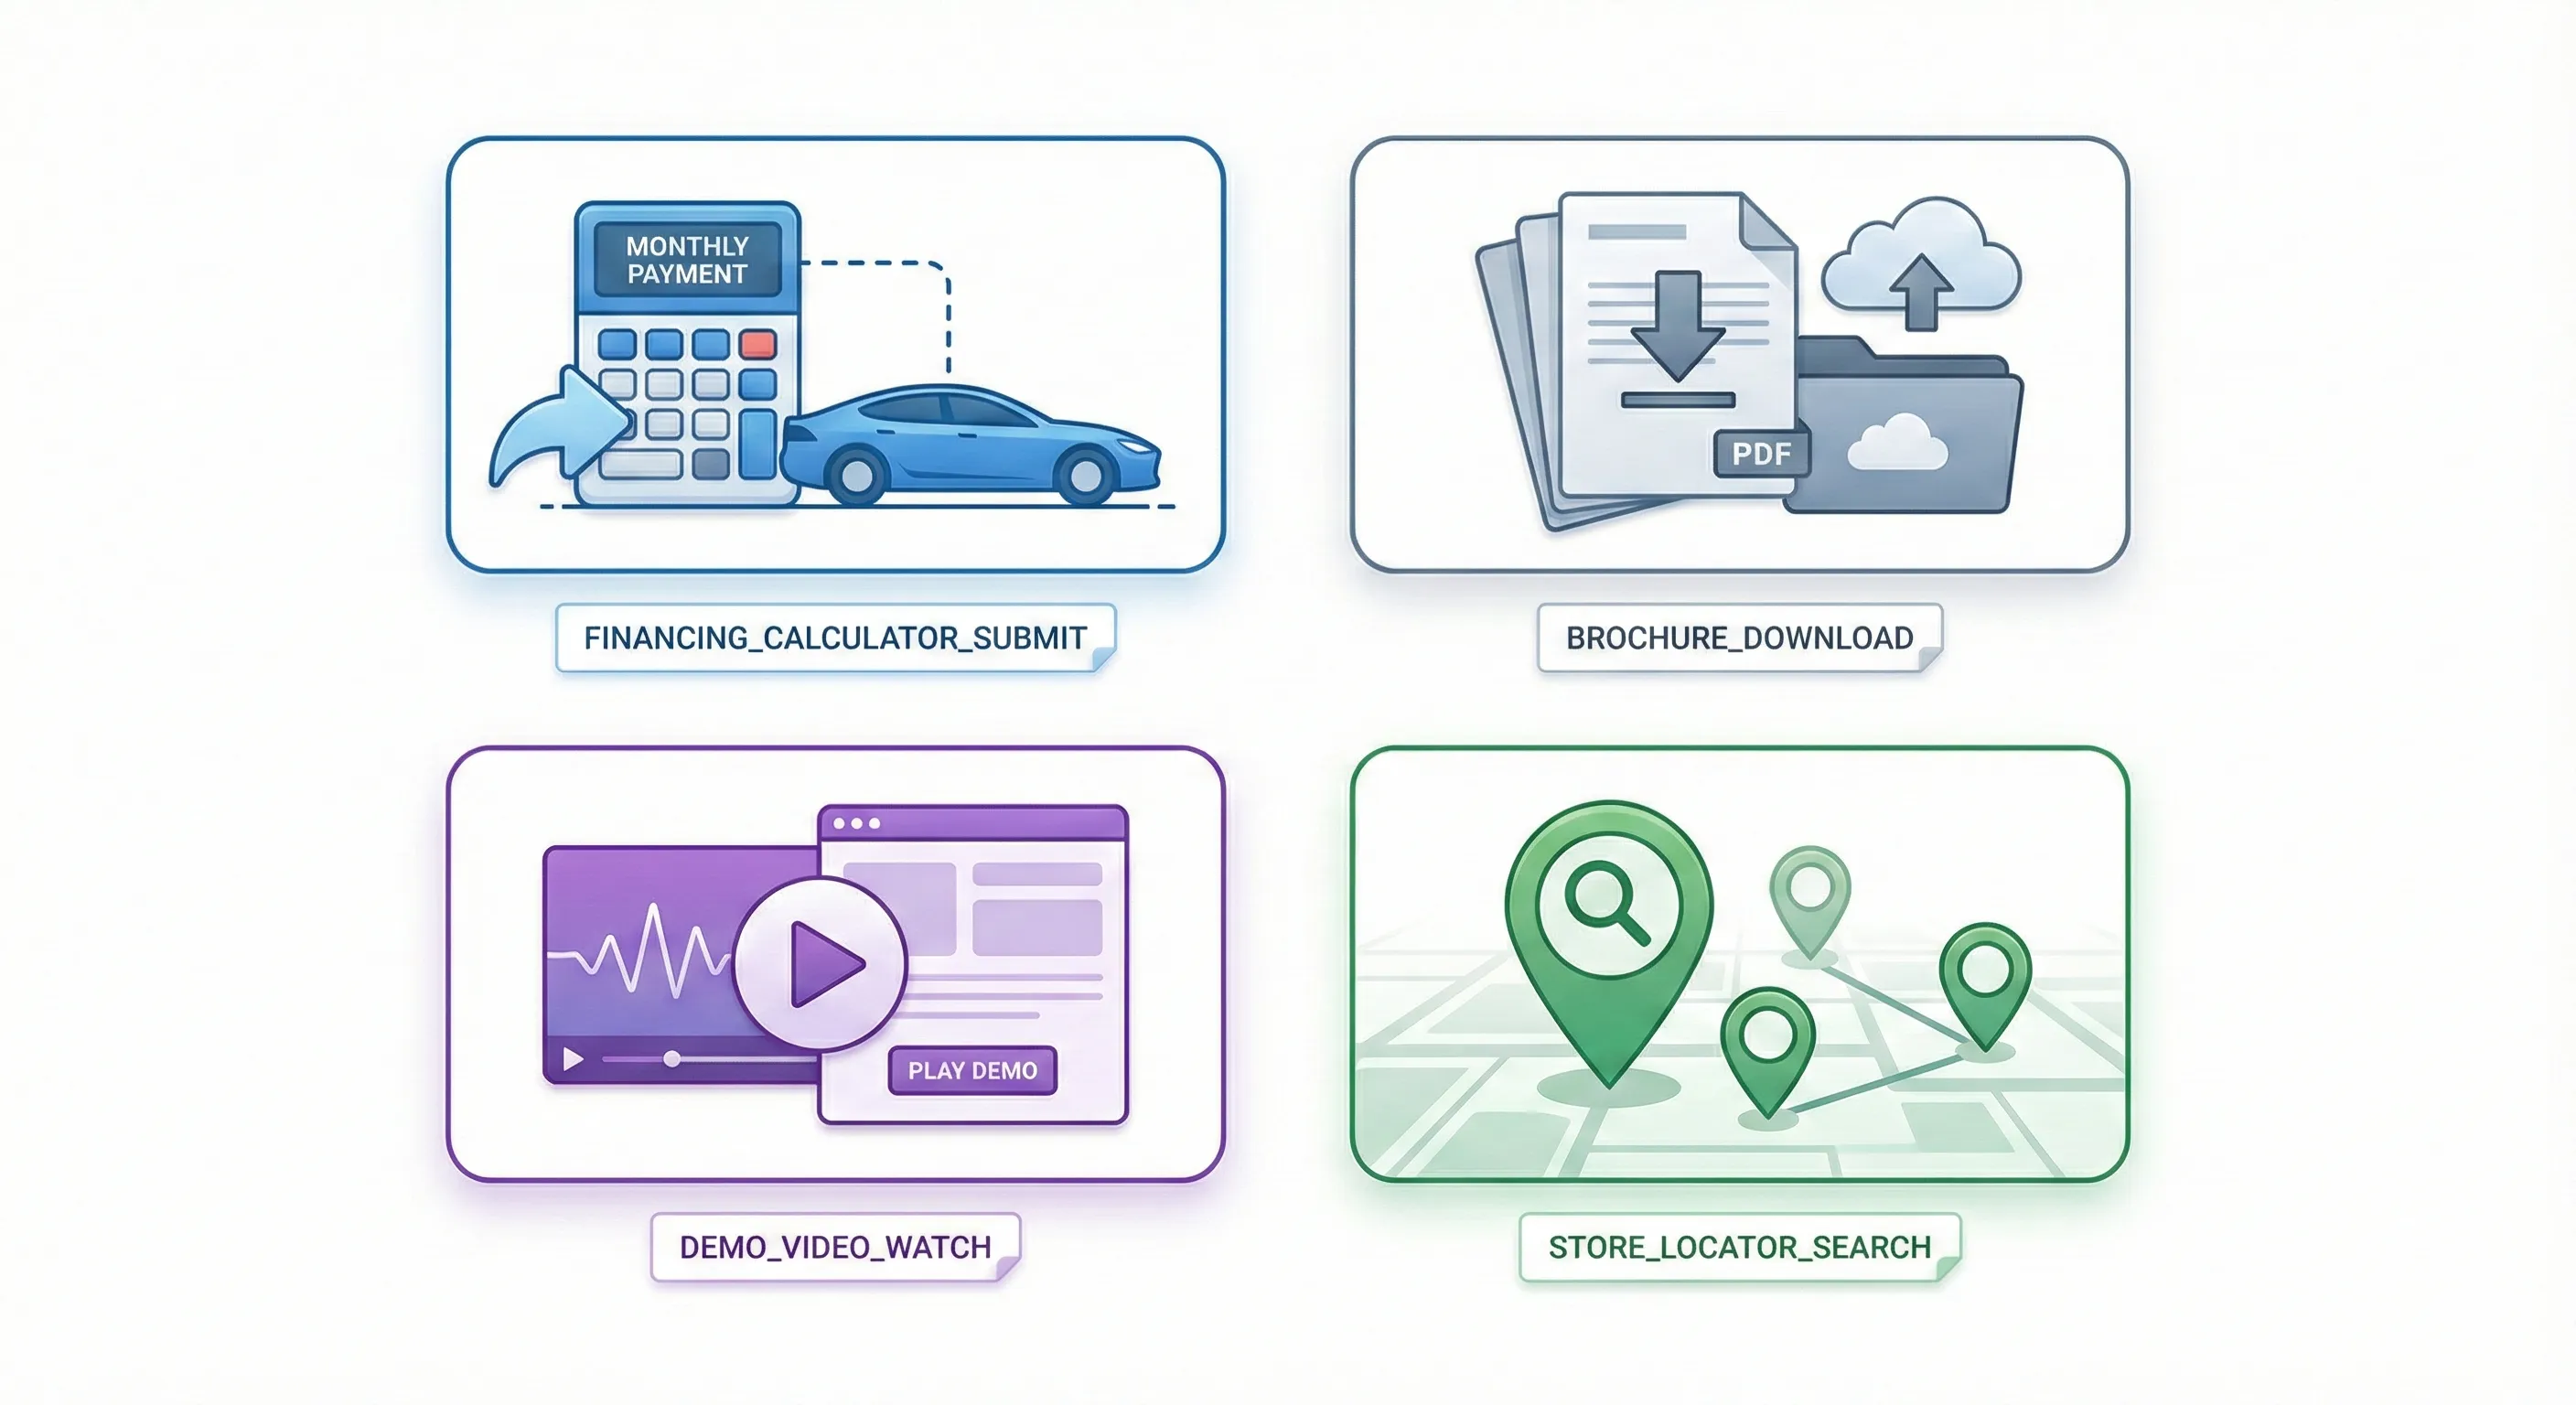
Examples of Custom Events:
- “Clicked_Financing_Calculator” (for an auto dealership)
- “Downloaded_Product_Brochure” (for B2B companies)
- “Watched_Demo_Video” (for SaaS businesses)
- “Used_Store_Locator” (for multi-location retailers)
Why Use Custom Events?
- Track business-specific actions that matter to your unique customer journey
- Build custom audiences based on niche behaviors
- Measure micro-conversions that indicate interest but aren’t standard events
Important Limitation: Custom events cannot be used for campaign optimisation or conversion reporting in the same way as standard events. They’re primarily useful for audience building and insights, not for direct ad optimisation.
Which Events Should You Implement?
For this guide, we’re focusing on standard events because they provide the most value for advertising optimisation and are what Meta’s algorithm is designed to work with.
The specific events you implement depend on your business model:
E-commerce Businesses should prioritise:
- ViewContent (product page views)
- AddToCart (cart additions)
- Purchase (completed orders)
Lead Generation Businesses should prioritise:
- PageView (site visits)
- Lead (form submissions)
- ViewContent (key content page views)
The good news: By using the GA4 data layer approach outlined in this guide, you’re setting up the most scalable foundation. Once the basic structure is in place, adding additional standard events (like InitiateCheckout or Search) follows the exact same pattern and takes just minutes.
Part 1: PageView Event Tracking
This tag is responsible for loading the Meta Pixel library on every page of the site and tracking a standard PageView event.
- Navigate to the Tags section and click New.
- Name the tag
Meta - PageView. - Click Tag Configuration and select the Facebook Pixel template you added from the gallery.
- In the “Facebook Pixel ID(s)” field, click the variable icon (looks like a grey lego block) and select your
{{Const - Meta Pixel ID}}variable. - From the “Event Name” dropdown, select PageView.
- Expand More Settings then click the variable icon next to the Event ID field and select your
{{Event ID}}variable. - Click Triggering and select the Initialisation – All Pages trigger. This trigger is recommended as it fires earlier than the standard “All Pages” trigger, ensuring the Pixel library is loaded as quickly as possible.
- Click Save.

Part 2: Purchase Conversion & Other E-commerce Event Tracking
With the PageView event in place, the next stage is to map the standard GA4 e-commerce events from the data layer to their corresponding Meta Pixel standard events. For each event, a new tag will be created in Google Tag Manager that uses the “Facebook Pixel” template.
GA4 view_item -> Meta ViewContent
This event should fire whenever a user views a product detail page. It provides Meta’s systems with crucial data for dynamic product ads and audience building.
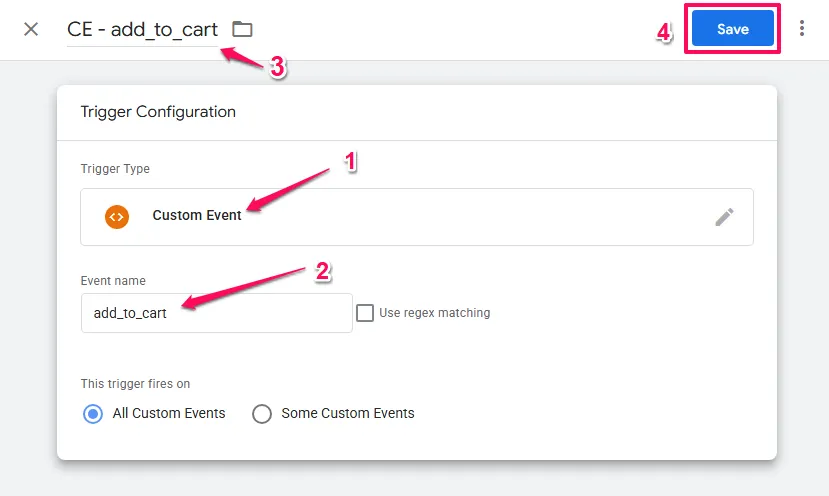
Trigger Setup:
- Navigate to Triggers and click New.
- Name the trigger
CE - view_item. - Select the Custom Event trigger type.
- For “Event name,” enter
view_item. - Leave “This trigger fires on” set to “All Custom Events.”
- Click Save.

Tag Setup:
- Navigate to Tags and click New.
- Name the tag
Meta - ViewContent. - Select the Facebook Pixel tag type.
- Set the “Facebook Pixel ID(s)” to
{{Const - Meta Pixel ID}}. - Set the “Event Name” to ViewContent.
- Expand the Object Properties section. This is where the data layer variables are mapped to Meta’s required parameters.
- Click Add Property for each parameter listed in the table below.
- In the “More Settings” section, enter
{{Event ID}}into the Event ID field. - Attach the
CE - view_itemtrigger to this tag. - Click Save.
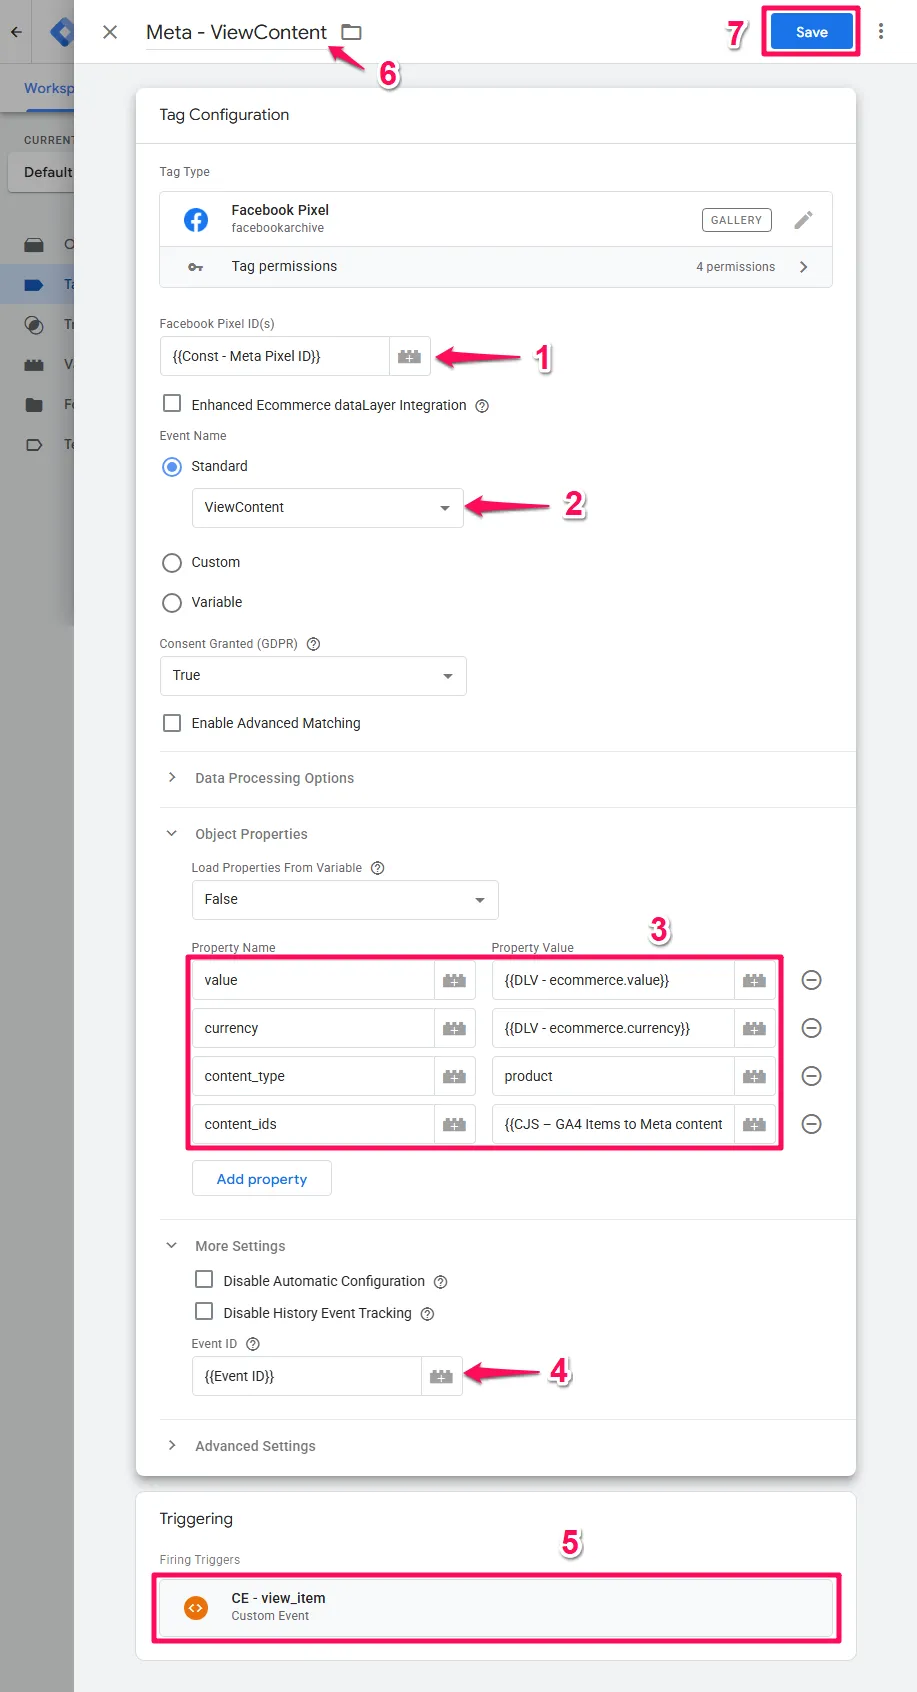
Variable Mapping for ViewContent
| Meta Parameter | GA4 Data Layer Source | GTM Variable Type / Name |
value | ecommerce.value | Data Layer Variable / DLV - ecommerce.value |
currency | ecommerce.currency | Data Layer Variable / DLV - ecommerce.currency |
content_type | Hardcoded: ‘product’ | N/A (Type ‘product’ directly in the tag’s property value field) |
content_ids | Transformed from ecommerce.items | Custom JavaScript / CJS - GA4 Items to Meta content_ids |
GA4 add_to_cart -> Meta AddToCart
This event tracks when a user adds an item to their shopping cart, a strong signal of purchase intent.
Trigger Setup: Create a new Custom Event trigger named CE - add_to_cart that fires on the event name add_to_cart.
Tag Setup:
- Create a new Facebook Pixel tag named
Meta - AddToCart. - Set the Pixel ID to
{{Const - Meta Pixel ID}}. - Set the “Event Name” to AddToCart.
- Map the Object Properties according to the table below.
- Set the Event ID to
{{Event ID}}. - Attach the
CE - add_to_carttrigger. - Click Save.
Variable Mapping for AddToCart
| Meta Parameter | GA4 Data Layer Source | GTM Variable Type / Name |
value | ecommerce.value | Data Layer Variable / DLV - ecommerce.value |
currency | ecommerce.currency | Data Layer Variable / DLV - ecommerce.currency |
content_type | Hardcoded: ‘product’ | N/A (Type ‘product’ directly in the tag’s property value field) |
contents | Transformed from ecommerce.items | Custom JavaScript / CJS - GA4 Items to Meta contents |
content_ids | Transformed from ecommerce.items | Custom JavaScript / CJS - GA4 Items to Meta content_ids |
GA4 purchase -> Meta Purchase: Conversion Tracking
The Purchase event is the most critical conversion action for any e-commerce business. Its accurate implementation is paramount for measuring ad effectiveness and optimising campaigns. This purchase event serves as your primary conversion signal for Meta’s campaign optimisation. When properly configured with conversion tracking, it enables Meta’s algorithm to find customers most likely to complete a purchase and provides accurate conversion value data for ROAS (Return on Ad Spend) measurement.
With the Custom JavaScript variables now created in the foundational setup, implementing the Purchase conversion event follows the same consistent pattern as the other e-commerce events.
Trigger Setup: Create a new Custom Event trigger named CE - purchase that fires on the event name purchase.
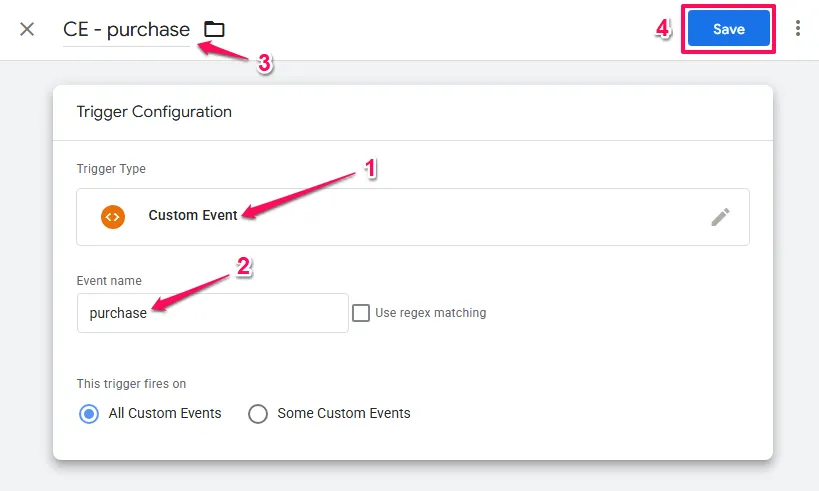
Tag Setup:
- Create a new Facebook Pixel tag named
Meta - Purchase. - Set the Pixel ID to
{{Const - Meta Pixel ID}}. - Set the “Event Name” to Purchase.
- Map the Object Properties according to the table below.
- Set the Event ID to
{{Event ID}}. - Attach the
CE - purchasetrigger. - Click Save.
Variable Mapping for Purchase
| Meta Parameter | Required? | GA4 Data Layer Source | GTM Variable Type / Name |
value | Yes | ecommerce.value | Data Layer Variable / DLV - ecommerce.value |
currency | Yes | ecommerce.currency | Data Layer Variable / DLV - ecommerce.currency |
content_type | If no content_type is provided, Meta will match the event to every item that has the same ID, independent of its type. | Hardcoded: ‘product’ | N/A (Type ‘product’ directly in the tag’s property value field) |
content_ids | Yes (for Ads) | Transformed from ecommerce.items | Custom JavaScript / CJS - GA4 Items to Meta content_ids |
contents | Yes (for Ads) | Transformed from ecommerce.items | Custom JavaScript / CJS - GA4 Items to Meta contents |
Part 3: Lead Conversion Tracking
The same single-source-of-truth methodology can be applied to lead generation business models. In this context, the GA4 recommended event generate_lead serves as the primary conversion action, equivalent to a purchase in e-commerce.
GA4 generate_lead -> Meta Lead
This event tracks a form submission for a newsletter, a quote request, a demo booking, or any other action that signifies a user has become a lead. Implementing proper lead conversion tracking allows Meta to optimise your campaigns for lead quality, not just quantity. A simple implementation only tracks the conversion event itself, but a more advanced setup can pass a conversion value associated with each lead. This unlocks “Value Optimisation” in Meta Ads, allowing the platform’s algorithm to optimise not just for the number of lead conversions, but for the quality and potential revenue of those leads. This is a powerful lever for improving the business impact of advertising spend.
Trigger Setup: Create a new Custom Event trigger named CE - generate_lead that fires on the event name generate_lead.
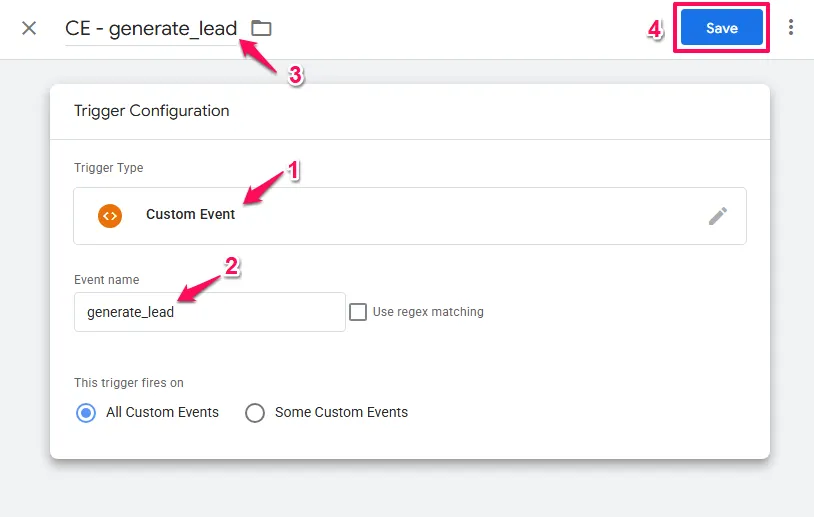
Tag Setup:
- Create a new Facebook Pixel tag named
Meta - Lead. - Set the Pixel ID to
{{Const - Meta Pixel ID}}. - Set the “Event Name” to Lead.
- Expand the Object Properties section.
- If the
generate_leaddata layer push includesvalueandcurrencyproperties (e.g., a lead for an enterprise product might be assigned a value of $500), map them accordingly.- Add property
valuewith value{{DLV - value}}. - Add property
currencywith value{{DLV - currency}}.
- Add property
- Set the Event ID to
{{Event ID}}. - Attach the
CE - generate_leadtrigger. - Click Save.
Verification and Debugging: Making Sure Everything Works
Thorough verification is a non-negotiable final step to ensure data accuracy and that conversion events are being tracked correctly for accurate campaign measurement and optimisation. It is the difference between thinking your tracking works and knowing it works. This section will show you exactly what to look for when testing each event using three critical tools working together: Meta Events Manager (Test Events), GTM Preview Mode, and the Meta Pixel Helper.
Essential Tools Setup
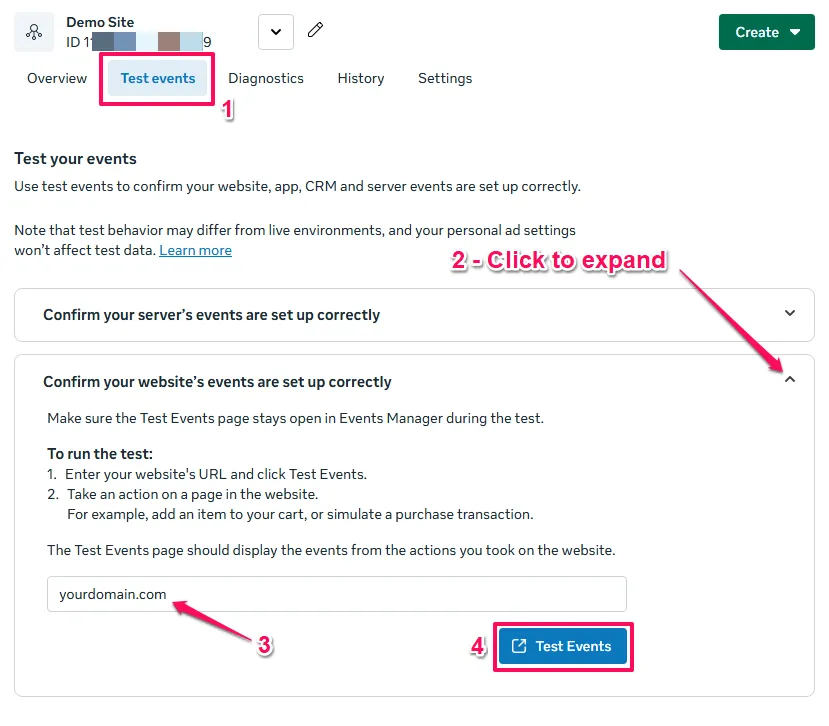
Tool 1: Meta Events Manager – Test Events
Test Events is Meta’s built-in real-time event monitoring tool. It shows you exactly what data Meta’s servers are receiving from your website as it happens. This must be set up before you begin testing with Google Tag Manager’s Preview Mode.
How to Set It Up:
- Go to Meta Events Manager
- Select the Dataset that has your pixel ID
- Choose the “Test Events” tab
- Click to expandable accordion that says “Confirm your website’s events are set up correctly”
- Enter your site the the Enter website URL field
- Click the Test Events button.
- Important: This opens your website in a new browser tab. Leave this tab open – don’t close it. This tab is now connected to Test Events and will show all pixel activity in real-time
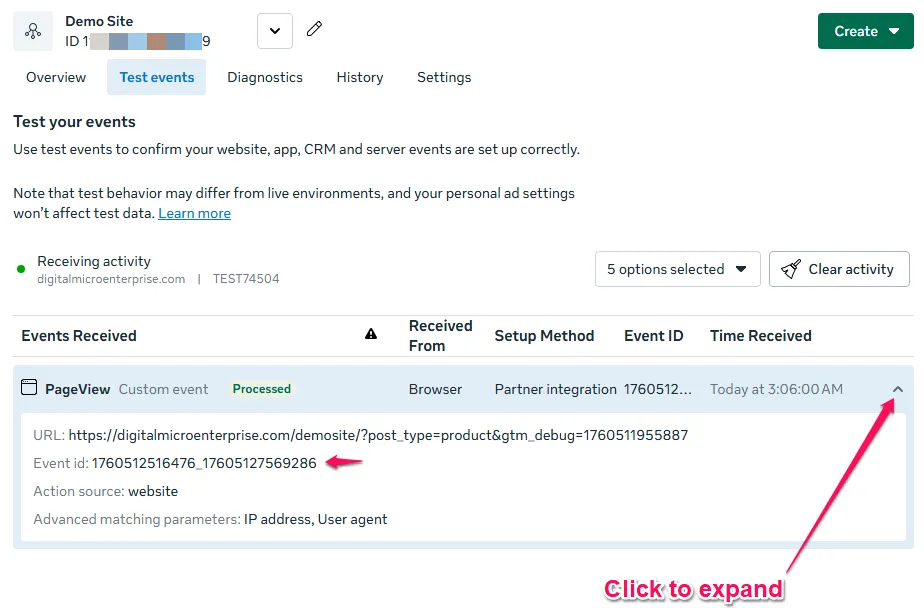
What you’ll see: The Test Events interface shows a live feed of every event your pixel fires. Each event appears within seconds of the action occurring on your website, with all the parameters Meta received.
Why start here: By opening your website through Test Events first, you establish the connection between Meta’s monitoring system and your browser session. This means you’ll be able to verify that Meta is successfully receiving your events throughout the entire testing process.
Tool 2: Meta Pixel Helper (Chrome Extension)
The Meta Pixel Helper is a free Chrome browser extension that shows you in real-time what data is being sent from your website to Meta’s servers.
How to Install It:
- Open Chrome and go to the Chrome Web Store
- Search for “Meta Pixel Helper”
- Click “Add to Chrome” on the official Meta Pixel Helper extension
- Once installed, you’ll see a small icon in your browser’s toolbar (it looks like “</>” inside a shopping bag)
- The icon is gray when no pixel is detected, and turns blue when it detects pixel activity
Reading the Pixel Helper:
- Green checkmark = Event sent successfully
- Yellow warning = Event sent but may have issues (often just warnings about additional parameters)
- Red error = Event failed to send or has critical errors
Tool 3: Tag Assistant (Chrome Extension)
This extension improves the Preview Mode of Google Tag Manager. When you use the Preview Mode in Google Tag Manager, it is actually using Google Tag Assistant. The Tag Assistant Chrome Extension adds some additional usability feature such as having each instance of Tag Assistant open in tabs of the same browser rather than a new window, coloured symbols to differentiate each tag assistant instance and more.
Go to Tag Assistant in the Chrome Store and add to chrome.
Tool 4: Google Tag Manager Preview Mode
Preview Mode allows you to see exactly what’s happening inside your GTM container as you interact with your website. It’s built directly into GTM – no installation needed.
How to Enable It (CRITICAL: Follow this sequence):
- First, make sure you’ve opened your website through Meta Events Manager Test Events (see Tool 1 above)
- In your GTM workspace, click the “Preview” button in the top right
- Tag Assistant will open in a new tab and a Connect Tag Assistant to your site modal should be visible
- Enter site in the Your website’s URL field
- Click “Connect”
- Your website will open in a new tab and should connected to both Tag Assistant (GTM Preview) AND Test Events
Why this sequence matters: By connecting GTM Preview to the same browser tab that’s already connected to Test Events, all three tools monitor the same session simultaneously. This gives you complete visibility into your tracking implementation.
The Three-Tool Verification Process
For reliable tracking, you must verify using ALL THREE tools:
- GTM Preview Mode confirms the internal logic is correct (triggers firing, variables populating)
- Meta Pixel Helper confirms the data is actually being sent from your browser
- Test Events confirms Meta’s servers are receiving and processing the data correctly
Many implementation problems come from only checking one or two of these. Always use all three together for complete confidence in your tracking.
Verifying the PageView Event
This is the simplest event to verify and a good starting point.
In GTM Preview Mode:
- With Preview Mode active and connected to your website tab, navigate to any page
- In the Tag Assistant tab, click on the “Initialisation” event in the left sidebar
- Look for your
Meta - PageViewtag in the “Tags Fired” section
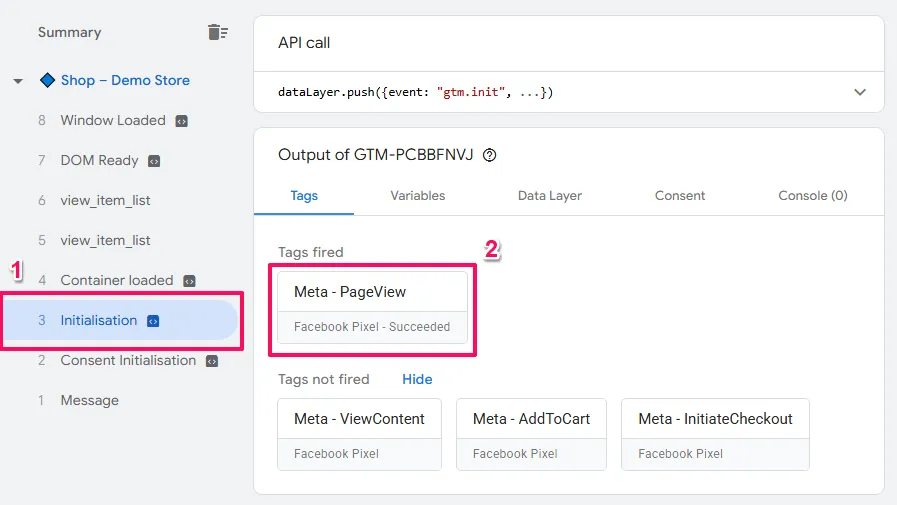
- Click on the tag name and select “Values” to see the details
- What to verify:
- The Pixel ID matches your actual Meta Pixel ID
- The Event Name shows “PageView”
- The tag fired without errors

In Meta Pixel Helper:
- On any page of your website, click the Pixel Helper icon in your browser toolbar
- You should see “PageView” listed with a green checkmark
- Click to expand the PageView event details
- What to verify:
- Event Name: Confirms “PageView”
- Pixel ID: Should match the ID from your Meta Events Manager
In Meta Events Manager – Test Events:
- Look at the Test Events interface (you should still have this open from setup)
- Within seconds of loading the page, you’ll see a new “PageView” event appear in the activity feed
- Click on the event to expand its details
- What to verify:
- Event Name: Shows “PageView”
- Event Time: Should be within the last few seconds
- Pixel ID: Matches your pixel
- Browser Information: Shows your current browser details, confirming it’s receiving data from YOUR session
Common Issues:
- Pixel Helper shows nothing: Check that your GTM container is installed on the page and that you’ve published your changes in GTM
- Tag doesn’t fire in Preview Mode: Verify the “Initialization – All Pages” trigger is attached to the tag
- Test Events shows nothing: Make sure you opened your website through the Test Events “Open Website” button, not by manually typing the URL in a new tab
Verifying the ViewContent Event
This event fires when someone views a product detail page on your e-commerce site.
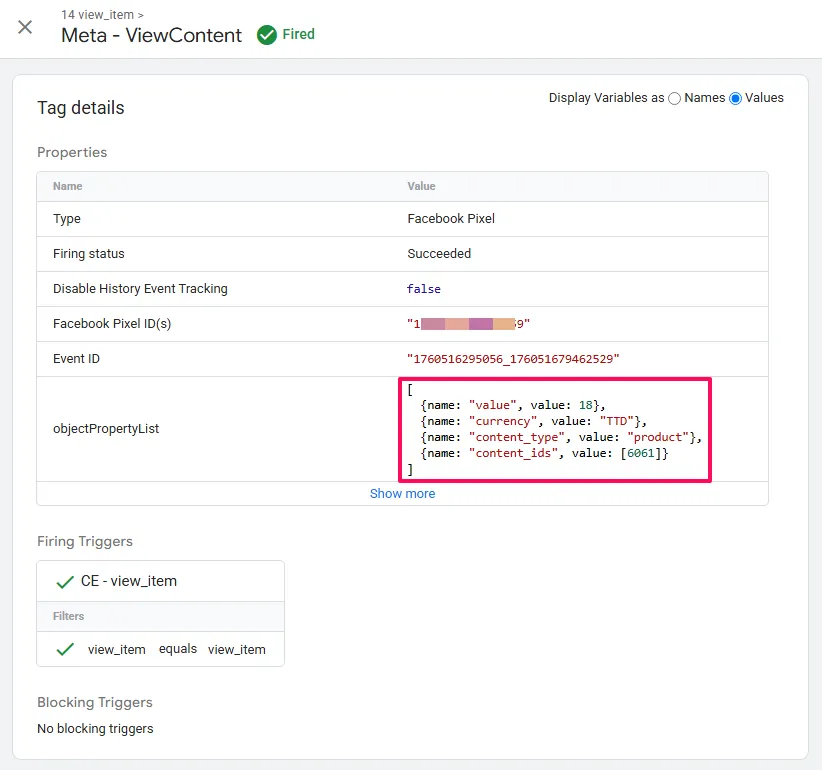
In GTM Preview Mode:
- Navigate to a product detail page on your website
- In Tag Assistant, click on the
view_itemevent in the left sidebar - Find your
Meta - ViewContenttag in “Tags Fired” - Click the tag and select “Values”
- What to verify:
content_ids: Should show the product SKU/ID (e.g., “ABC123”)content_type: Should show “product”value: Should show the product price as a numbercurrency: Should show the currency code (e.g., “USD”)event_id: Ensure has value
In Meta Pixel Helper:
- While on the same product page, click the Pixel Helper icon
- You should see “ViewContent” with a green checkmark
- Expand the ViewContent event
- What to verify:
- Event Name: “ViewContent”
- content_ids: Matches the product ID you saw in GTM Preview
- value and currency: Match the product price
- event_id: Exactly matches the ID from GTM Preview Mode
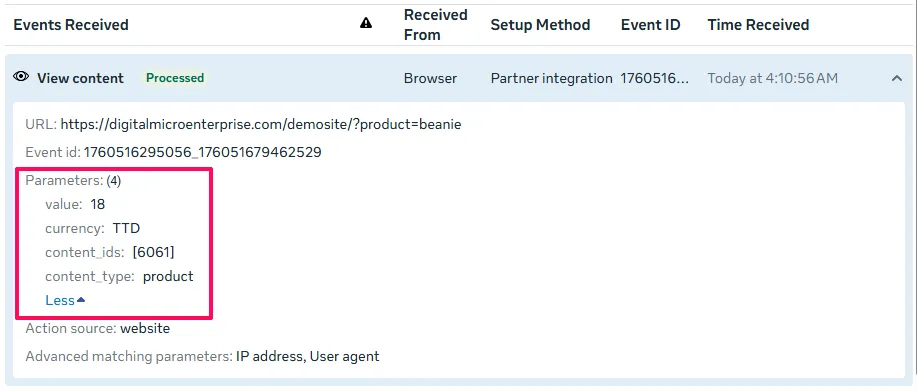
In Meta Events Manager – Test Events:
- Check the Test Events feed – a new “ViewContent” event should appear within seconds
- Click to expand the event details
- What to verify:
- Event Name: “ViewContent”
- Parameters section:
content_ids: Shows the correct product ID (matches GTM and Pixel Helper)value: Shows the product pricecurrency: Shows the correct currency code
- Event ID: Exactly matches what you saw in GTM Preview and Pixel Helper
- Event Source: Shows as “Browser” (because it came from the Meta Pixel, not server-side)
This three-way match is critical: All three tools (GTM Preview, Pixel Helper, and Test Events) should show the exact same data. If they don’t match, something is being lost in transmission.
Common Issues:
- Variables are “undefined”: Your GA4 data layer isn’t pushing the
view_itemevent correctly. Go to the “Data Layer” tab in Tag Assistant to inspect what’s actually in the data layer. - content_ids is empty: Check that your Data Layer Variable path is correct (
ecommerce.items.0.item_id) - Event doesn’t fire: Verify your Custom Event trigger is set to fire on
view_item(case-sensitive) - Data in Test Events doesn’t match GTM: The Pixel Helper should reveal what’s actually being sent – check there for discrepancies
Verifying the AddToCart Event
This event fires when a user adds a product to their shopping cart.
In GTM Preview Mode:
- Add a product to your cart
- In Tag Assistant, locate the
add_to_cartevent - Find your
Meta - AddToCarttag in “Tags Fired” - Click the tag and check “Values”
- What to verify:
- All the same parameters as ViewContent (content_ids, value, currency)
event_id: Should be a unique ID (different from ViewContent’s ID)
In Meta Pixel Helper:
- After adding to cart, click the Pixel Helper icon
- Look for “AddToCart” with a green checkmark
- Expand the event details
- What to verify:
- All parameters match what you saw in GTM Preview
- The
valuereflects the price of the item added (not the cart total) event_idis present and unique
In Meta Events Manager – Test Events:
- Look for the new “AddToCart” event in the Test Events feed
- Expand the event details
- What to verify:
- Event Name: “AddToCart”
- Parameters: All match what you saw in GTM Preview and Pixel Helper
- Event ID: Matches across all three tools
- Timing: Event appeared within seconds of you adding the item to cart
Common Issues:
- AddToCart fires multiple times: Check if you have duplicate triggers or if your site’s add-to-cart button triggers multiple data layer pushes
- Value is wrong: Ensure your data layer is pushing
ecommerce.items.0.pricefor the specific item added, not a cart total - Test Events shows a different value than Pixel Helper: This indicates a data transformation issue – review your GTM variables
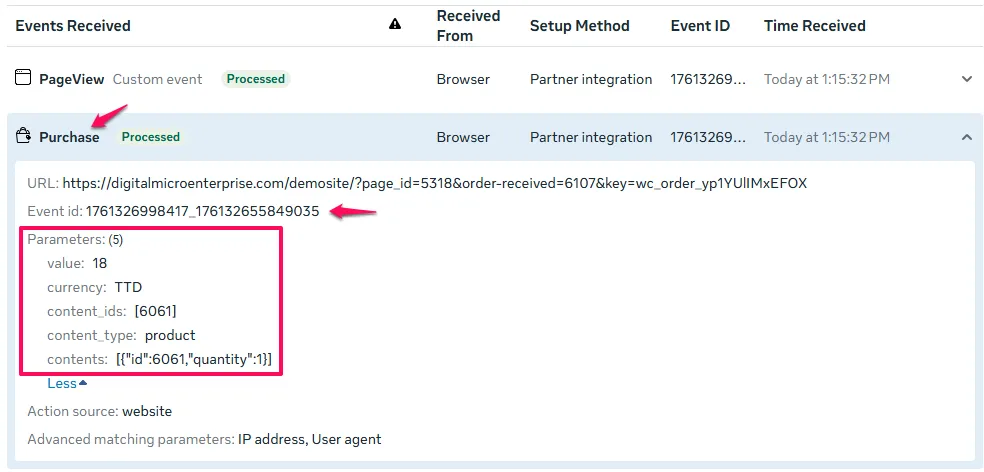
Verifying the Purchase Event
This is your most critical event – it tracks completed transactions and directly impacts ad attribution and ROI measurement.
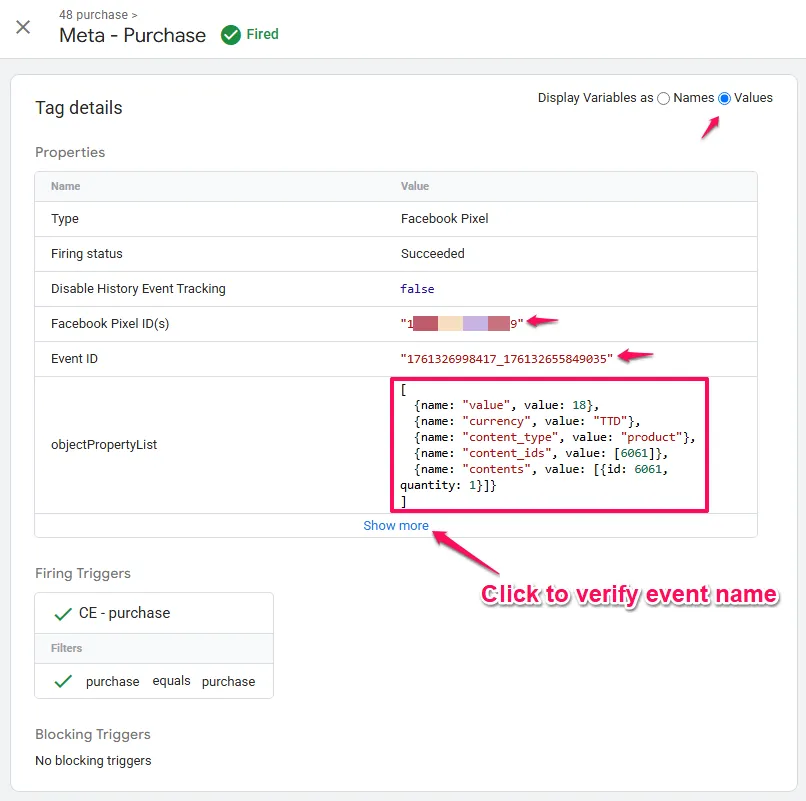
In GTM Preview Mode:
- Complete a full checkout process and land on the “Thank You” or order confirmation page
- In Tag Assistant, click on the
purchaseevent - Find your
Meta - Purchasetag - Click the tag and review “Values”
- What to verify:
value: Should be the complete order total (matches what the customer paid)currency: Correct currency codecontent_ids: Should be an ARRAY of all product IDs in the order (e.g., [“ABC123”, “XYZ789”])contents: Should be an array of objects withidandquantityfor each productevent_id: Must be present and unique
In Meta Pixel Helper:
- On the confirmation page, click the Pixel Helper icon
- Look for “Purchase” with a green checkmark
- Expand the Purchase event
- What to verify:
- Event Name: “Purchase”
- value: Exactly matches the order total
- currency: Matches the currency
- content_ids: Contains all product IDs from the order
- contents: Shows the full array with IDs and quantities
- event_id: Present and matches GTM Preview exactly
In Meta Events Manager – Test Events:
- Check the Test Events feed for the new “Purchase” event
- Click to expand it – this is the most important verification
- What to verify:
- Event Name: “Purchase”
- Parameters section:
value: Exactly matches the order total from your test purchasecurrency: Correct currency codecontent_ids: Array containing all product SKUs from the ordercontents: Full array with id and quantity for each line item
- Event ID: Must be present and must EXACTLY match what you saw in both GTM Preview and Pixel Helper
- Event Source: Shows “Browser”
- Event Status: Should show a green checkmark or “Received”
This three-way verification is CRITICAL for the Purchase event:
- GTM Preview shows what GTM intended to send
- Pixel Helper shows what left your browser
- Test Events shows what Meta’s servers actually received
If all three match perfectly, your Purchase tracking is correctly implemented and ready for production. If there are any discrepancies between the three tools, you must troubleshoot before going live.
The event_id verification is especially important: This unique ID is what enables deduplication when you later implement the Conversions API. If it’s missing or different across the three tools, your future CAPI implementation will double-count conversions.
Common Issues:
- content_ids shows “[object Object]”: Your Custom JavaScript variable isn’t correctly transforming the data. Double-check the code in the
CJS - GA4 Items to Meta content_idsvariable - Purchase fires on every page: Your trigger is too broad. Make sure the Custom Event trigger is specifically listening for the
purchaseevent name - Value doesn’t match order total: Check whether your data layer is pushing
ecommerce.valuewith the correct total (including tax and shipping if applicable) - Test Events shows different data than Pixel Helper: There’s a data transformation issue. Check your GTM variables – something is changing between GTM and what’s sent to Meta
Verifying the Lead Event
For lead generation businesses, this event tracks form submissions.
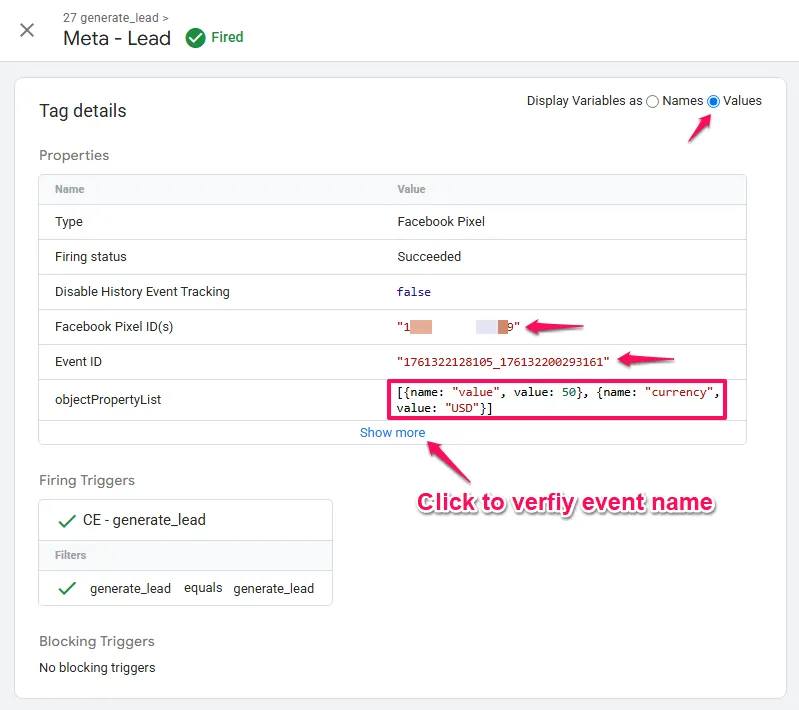
In GTM Preview Mode:
- Submit a lead form on your website (contact form, newsletter signup, quote request, etc.)
- In Tag Assistant, find the
generate_leadevent - Locate your
Meta - Leadtag in “Tags Fired” - Click the tag and check “Values”
- What to verify:
event_id: Present and uniquevalueandcurrency(if you’re tracking lead value): Should match the value assigned to that lead type- Tag fired successfully without errors
In Meta Pixel Helper:
- After form submission, click the Pixel Helper icon
- Look for “Lead” with a green checkmark
- Expand the event
- What to verify:
- Event Name: “Lead”
- event_id: Matches GTM Preview
- value (if applicable): Matches the lead value
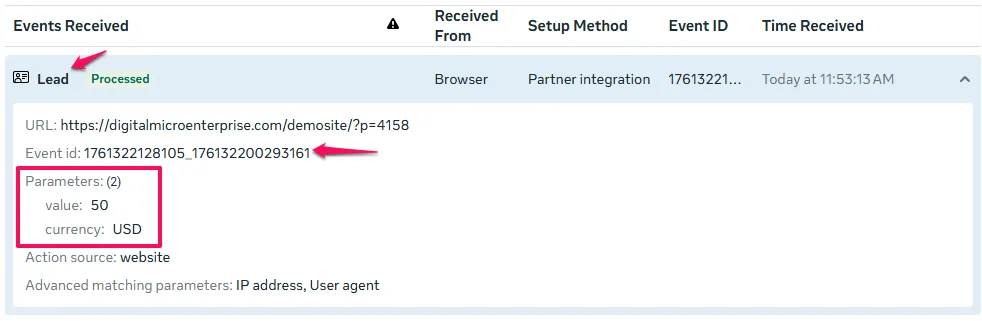
In Meta Events Manager – Test Events:
- Check the Test Events feed for the “Lead” event
- Expand the event details
- What to verify:
- Event Name: “Lead”
- Event ID: Matches GTM Preview and Pixel Helper
- Parameters: If you’re passing lead value, verify
valueandcurrencymatch - Event Source: Shows “Browser”
Common Issues:
- Lead event doesn’t fire: Confirm that your website’s form is pushing a
generate_leadevent to the data layer upon successful submission - Lead fires too early: Make sure the data layer push happens AFTER form validation, not on the initial button click
- Test Events doesn’t receive the event: Check that you’re testing in the same browser tab you opened from Test Events
Understanding Your Test Events Results
Once you’ve verified all your events, the Test Events interface provides valuable insights:
Activity Log:
- Shows all events in chronological order
- Each event displays its timestamp, making it easy to correlate with your test actions
- Color-coded status (green = successful, red = error)
Event Details:
- Click any event to see the complete parameter list
- Verify that all expected parameters are present and populated
- Check the Event ID for consistency across events
Browser Information:
- Confirms the events are coming from YOUR testing session
- Shows your browser type, operating system, and IP address
- Helpful for confirming you’re monitoring the correct traffic
Common Test Events Status Indicators:
- Green checkmark: Event received successfully with all expected parameters
- Yellow warning: Event received but may be missing recommended parameters (often not critical)
- Red error: Event failed validation – check for missing required parameters or incorrect data types
What to do after successful verification: Once all your events show up correctly in Test Events with matching data across all three tools (GTM Preview, Pixel Helper, and Test Events), you can be confident your implementation is production-ready. The Test Events connection only lasts for your browser session – once you close the tab or end the test, the events will no longer appear in Test Events. This is normal – Test Events is only for initial setup and debugging, not ongoing monitoring.
Using Meta Events Manager for Ongoing Monitoring
Beyond initial testing, Events Manager provides ongoing visibility into your pixel’s performance after you’ve completed your implementation and your pixel is collecting real user data.
How to Check Event Data:
- In Events Manager, select your Pixel
- Click “Overview” in the left sidebar
- You’ll see a dashboard showing:
- Total events received in the last 7 days
- A breakdown by event type (PageView, ViewContent, Purchase, etc.)
- Event trends over time
What to Look For:
- Consistent event volume: If you normally see 50 purchases per day and suddenly see 0, something is broken
- Event parameters: Click on any event to see example payloads and verify parameters are populating
- Browser vs. Server events: Once you implement CAPI, you’ll see events tagged as “Browser” and “Server” – they should have matching
event_idvalues
Setting Up Event Diagnostics: Meta can automatically alert you to tracking issues:
- In Events Manager, click “Diagnostics” in the left sidebar
- Set up email notifications for critical issues like:
- Pixel not firing
- Significant drops in event volume
- Parameter issues
Next Steps: Expanding Your Conversion Tracking Ecosystem
Verify Your Implementation Thoroughly
Before moving forward, complete comprehensive verification using all three monitoring tools together:
Immediate Testing Protocol:
- Use GTM Preview Mode to confirm tags fire with correct variable values
- Install Meta Pixel Helper (Chrome extension) to verify data leaving your browser
- Monitor Test Events in Meta Events Manager to confirm Meta receives matching data
- Test each event type (ViewContent, AddToCart, Purchase/Lead) and verify the
event_idappears consistently across all three tools
Critical Success Indicators:
- All three tools show identical parameter values (especially
value,currency,content_ids) - Event IDs match exactly across GTM Preview, Pixel Helper, and Test Events
- Test Events shows “Received” status with green checkmarks for all events
Expand Your Meta Event Tracking
Once core events are working reliably, consider tracking additional user behaviours:
InitiateCheckout: Captures when users begin checkout, helping measure cart-to-purchase conversion rates
Search: Tracks on-site searches, revealing what users are looking for and building audiences of high-intent searchers
AddToWishlist: Identifies high-intent users for retargeting campaigns
The methodology is identical to what you’ve learned: create a GA4 data layer event, build the corresponding Custom Event trigger in GTM, and map it to the appropriate Meta standard event.
Understanding Meta Pixel Within Your Marketing Foundation

Meta Pixel tracks conversions from Facebook and Instagram ads, but it’s one component of a complete measurement infrastructure. Understanding how it connects with Google Analytics 4 (which tracks all traffic sources and user journeys), Google Ads conversion tracking (which measures search campaign performance), and Looker Studio (which synthesises conversion data from all platforms) creates a system that answers both “Are our Meta campaigns profitable?” and “How does Meta performance compare to our other paid and organic channels?”
If you’re wondering why cross-channel measurement matters specifically for Meta advertising, Why Your Meta Ads Need Google Analytics 4 explains the strategic importance. Once you understand that context, How to Analyse Your Website Traffic Using GA4 shows you the practical workflow for seeing which sources and campaigns actually drive conversions.
How to Build Your Marketing Measurement Foundation shows you how Meta Pixel integrates with your complete measurement infrastructure, connecting social advertising performance to unified cross-channel reporting, and enabling true marketing ROI analysis rather than isolated platform metrics.
Continue Building Your Tracking Infrastructure
Next Recommended Component: Conversions API (Server-Side Tracking)
Client-side tracking works well but faces increasing limitations from browser privacy features (ITP, ad blockers, cookie restrictions). The Conversions API sends conversion data from your server, creating a backup channel unaffected by browser limitations. You’ve already implemented the critical foundation: the event_id variable enables deduplication when both client-side and server-side events reach Meta, preventing double-counting whilst recovering conversions lost to browser restrictions.
CAPI implementation is more technical than client-side tracking, but the ROI in tracking accuracy is substantial, especially as privacy regulations continue to evolve.
Additional Expansion: Google Ads and LinkedIn conversion tracking follow the same data layer methodology you’ve learned here, making cross-platform implementation straightforward once your GA4 foundation exists.
If You Need Help
Meta Pixel implementation using GTM and the data layer is straightforward when following this methodology, but implementing Conversions API for server-side tracking backup, establishing conversion tracking across multiple advertising platforms (Google Ads, LinkedIn, TikTok) using the same data layer foundation, and building unified reporting that synthesises conversion performance from all sources requires understanding server-side architectures and cross-platform data reconciliation.
Our Marketing Measurement Foundation service provides complete implementation with Meta Pixel and Conversions API properly configured alongside your other platforms if you prefer expert setup.
Conclusion
By following this guide, an organisation can establish a robust, scalable, and highly consistent client-side conversion tracking infrastructure. The “single source of truth” approach, centred on the GA4 data layer, ensures inconsistent data is not sent to analytics and advertising platforms, streamlines tag management, and builds a foundation of trusted data for strategic decision-making. This setup is not just a technical improvement; it is a fundamental enhancement to the integrity and efficiency of the entire digital marketing operation.
With accurate conversion tracking now flowing to Meta’s platform, your advertising campaigns can leverage this data for conversion optimisation, automated bidding strategies, and precise ROAS reporting. The Purchase and Lead conversion events configured in this guide provide the essential signals that power Meta’s machine learning algorithms to improve campaign performance over time.
Frequently Asked Questions
What is the Meta Pixel (Facebook Pixel)?
The Meta Pixel (formerly Facebook Pixel) is a piece of JavaScript code that tracks visitor behavior on your website. When someone visits your site, the pixel sends information to Meta about their actions – like viewing a product, adding to cart, or making a purchase. This data helps you track which ads led to conversions, optimise ad delivery to people most likely to convert, and build audiences for retargeting. The pixel works silently in the background without changing your website’s appearance.
Do I need Google Tag Manager to use the Meta Pixel?
No, but it’s highly recommended. Without GTM, you’d manually edit your website’s HTML for every tracking change, manage separate code for each platform (Meta, Google Ads, Analytics), and risk breaking your site with coding errors. With GTM, you manage everything through a visual interface without touching website code, use one data layer to power all platforms consistently, and add new tracking in minutes instead of requiring development work.
How do I know if my Meta Pixel is working?
Use the Meta Pixel Helper Chrome extension – if the icon turns blue and shows events with green checkmarks, your pixel is working. You can also check Meta Events Manager to see if events like PageView, ViewContent, and Purchase are appearing in the Overview dashboard. For technical verification, use GTM Preview Mode to confirm your tags are firing and variables are populating correctly.
What’s the difference between PageView and ViewContent events?
PageView fires on every page and tracks generic visits for broad audience building. ViewContent fires only on product pages and includes specific product data (ID, name, price) for retargeting and Dynamic Product Ads. You need both – PageView for general traffic measurement and ViewContent for sophisticated product-specific advertising.
Why use the GA4 data layer instead of Meta’s default installation method?
The GA4 data layer approach creates a single source of truth where one data layer powers all your marketing platforms (Meta, Google Ads, Analytics) with consistent data. Meta’s default method requires separate code for each platform with different data structures, manual website edits for every change, and inconsistent data across systems. The data layer approach is more work upfront but makes everything easier, more accurate, and more maintainable long-term.
What is Meta Pixel conversion tracking?
Meta Pixel conversion tracking measures valuable actions users take on your website, such as purchases or form submissions. The Pixel sends this conversion data to Meta’s advertising platform, enabling you to measure campaign performance, calculate ROAS, and optimise campaigns using automated bidding strategies.
How do I track purchase conversions with the Meta Pixel?
Implement the Meta Pixel Purchase event on your order confirmation page with accurate transaction data (value, currency, product IDs). Using the GA4 data layer method ensures consistency and includes the event_id needed for Conversions API deduplication. Purchase conversion tracking is essential for measuring advertising ROI in e-commerce.
Can I track lead generation conversions with the Meta Pixel?
Yes, use the Meta Pixel Lead event when someone completes a form, sign-up, or quote request. Include a conversion value to enable Meta’s Value Optimisation, which prioritises high-quality leads over quantity. Lead conversion tracking is essential for B2B and service-based businesses.
Why is tracking conversion value important for Meta ads?
Conversion value enables accurate ROAS reporting and unlocks Meta’s Value Optimisation bid strategies. Instead of finding the cheapest conversions, Meta’s algorithm finds customers likely to spend more. For e-commerce, use order total. For leads, assign estimated values based on customer lifetime value.